

Image upscaling makes a picture larger by adding pixels the camera never recorded. Start with arithmetic: the pixels you need equal the print size in inches times the pixels per inch. Then pick a method. Interpolation spreads the pixels you have and adds no detail. AI upscaling draws plausible new detail. A 2x enlargement is usually safe, 4x needs a check at 100%, and past that the model is drawing.
The number comes first because it decides whether you need a tool at all. Many files that look too small are large enough for the job.
Key Takeaways
- Do the math first. Pixels needed = inches x pixels per inch (PPI). An 8 x 10 inch print at 300 PPI needs 2,400 x 3,000 pixels.
- Large prints need a lower PPI. One print vendor gives about 150 for a banner seen from 6 feet or more.
- Interpolation adds no detail. AI upscaling adds detail that was never captured, and researchers call it hallucinated. The ESRGAN paper says the hallucinated details in an earlier model “are often accompanied with unpleasant artifacts” (arXiv, October 2026).
- On a product photo, check texture, text, logos and fine pattern against the original at 100%.
- Fix first, then upscale once, from the best original you have.
What is image upscaling?
Image upscaling is the process of increasing the pixel dimensions of an image. A 1,000 x 1,000 pixel file becomes 2,000 x 2,000, or 4,000 x 4,000. The software has to produce every new pixel from the ones that exist. No method can read detail that the camera did not record.
To enlarge an image, to increase image resolution and to upscale all mean more pixels. Super resolution is the research name for methods that also try to add detail.
A 2x upscale doubles the width and the height, so the file holds four times the pixels. Adobe describes its Super Resolution feature that way: twice the width, twice the height, four times the total pixel count (blog.adobe.com, October 2026). In this article, 2x and 4x always mean the factor per side.
How many pixels do you need?
The formula is short. Pixels needed = size in inches x PPI. Do it once for the width and once for the height.
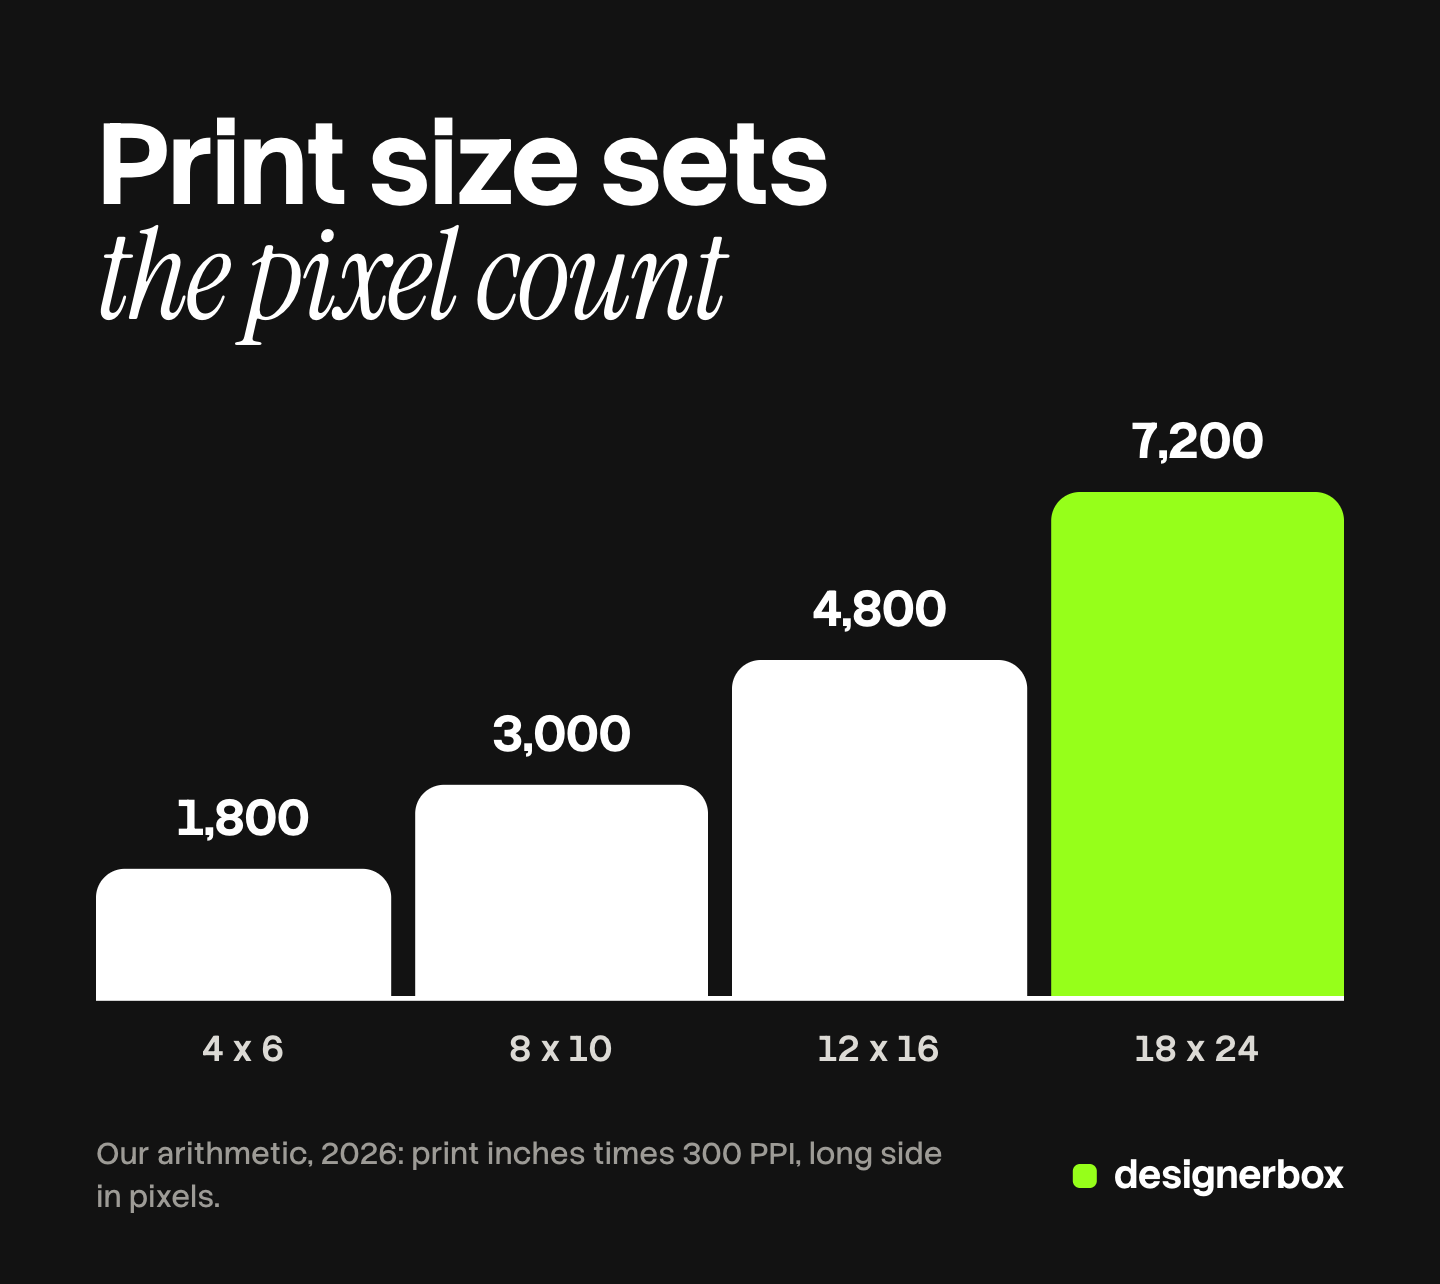
Then divide the pixels you need by the pixels you have. The result is the upscale factor. If it is 1 or less, you need no upscaling at all.
| Target | Arithmetic | Pixels needed |
|---|---|---|
| 4 x 6 inch photo print, 300 PPI | 4 x 300 by 6 x 300 | 1,200 x 1,800 |
| 8 x 10 inch print, 300 PPI | 8 x 300 by 10 x 300 | 2,400 x 3,000 |
| 12 x 16 inch t-shirt print area, 300 PPI | 12 x 300 by 16 x 300 | 3,600 x 4,800 |
| 18 x 24 inch poster, 300 PPI | 18 x 300 by 24 x 300 | 5,400 x 7,200 |
| 36 x 72 inch banner, 150 PPI | 36 x 150 by 72 x 150 | 5,400 x 10,800 |
| Square product image for Shopify | Shopify’s stated size | 2,048 x 2,048 |
| Product image for Google Shopping | Google’s recommended size | 1,500 x 1,500 or above |
The print rows are our arithmetic from the stated inches and PPI. The PPI values come from the print vendors quoted in the next section. Shopify says a square product image of 2048 x 2048 pixels “usually displays best” (Shopify Help Center, October 2026). Google recommends images “around 1500x1500 pixels or above” (Google Merchant Center Help, October 2026).
One worked example: your file is 1,000 x 1,250 pixels. You want an 8 x 10 inch print at 300 PPI, which needs 2,400 x 3,000 pixels. Divide 3,000 by 1,250. The factor is 2.4x.
A screen target is already a pixel size, so you compare the two numbers directly. A 1,000 pixel product photo needs about 2x to reach Shopify’s 2,048 pixels. If the real need is a smaller file or a different shape, upscaling is the wrong job. Our guide to resizing an image without losing quality covers scaling down and aspect ratio.
How to enlarge an image for printing
Image resolution for print depends on how close the viewer stands. A print in the hand needs more pixels per inch than a banner across a hall. So the right PPI is a range, and 300 is the top of it.
Three print vendors state their own numbers.
- Small and detailed prints. Printful calls 150 to 300 DPI ideal and asks for 300 on smaller products with a lot of detail (printful.com, October 2026).
- Posters seen from about 3 feet. 4over4 gives 200 to 300 DPI (4over4, October 2026).
- Banners. Helloprint writes that large banners do not need 300 DPI. It gives 200 DPI for a banner seen from 3 to 6 feet and 100 to 150 for medium distances. It gives 75 for very large outdoor displays (Helloprint, October 2026). 4over4 gives about 150 for a banner seen from 6 feet or more.
- Billboards. 4over4 says a billboard seen from across the street can look clean at roughly 50 DPI.
Print vendors write DPI where this article writes PPI. For file preparation the two are used as the same number. Check the file guide of the printer you use.
A 36 x 72 inch banner at 300 PPI would need 10,800 x 21,600 pixels. At 150 it needs 5,400 x 10,800, a quarter of the pixels. Pick the PPI from the viewing distance before you decide on an upscale factor.
Set the resolution at the final printed size. A file that reads 300 PPI at 4 inches wide is only 100 PPI at 12 inches wide. For print files made from generated artwork, AI tools for print on demand lists the sizes each print service asks for.
Interpolation and AI upscaling: the two families
Every upscaler belongs to one of two families. The difference is where the new pixels come from.
Interpolation calculates each new pixel from its neighbors. Bicubic uses cubic interpolation over the surrounding pixels. Lanczos uses what the Pillow imaging library calls “a high-quality Lanczos filter (a truncated sinc)” (Pillow documentation, October 2026). Both are averages of what exists. They add pixels and no detail, so edges turn soft as the factor grows.
AI upscaling uses a model trained on many images. The model predicts what a sharp version of your picture would look like, then draws that detail. The SRGAN paper of 2016 stated the problem that interpolation leaves open: how to recover finer texture detail at large upscaling factors (arXiv, October 2026). Newer models answer it with generated texture.
| Method | What it does | Good for | Risk |
|---|---|---|---|
| Bicubic or Lanczos interpolation | Averages nearby pixels with a formula | Small enlargements of a sharp photo, up to about 2x | Soft edges, no new detail |
| GAN super resolution (ESRGAN, Real-ESRGAN) | Draws texture learned from training images | Photos that need 2x to 4x | Invented texture and artifacts |
| Diffusion upscaling | Generates detail with an image generation model | Soft or heavily damaged sources, large factors | Detail that changes what the picture shows |
| Reshoot or new run | Records or produces the pixels at full size | Product detail that must be exact | Time and cost |
Results vary by source. The Real-ESRGAN authors trained it “with pure synthetic data”, with simulated damage in place of real damage (arXiv, October 2026). Your file may carry a kind of damage the model never saw.
Many products package these methods. Adobe says it trained Super Resolution on millions of photos (blog.adobe.com, October 2026). Topaz offers image upscaling in the browser and states a maximum of 8x (topazlabs.com, October 2026). If your question is which product to pick, our comparison of Magnific AI alternatives sorts the tools by scope.
How far can you upscale an image?
Use this as a working rule. It is our guideline, not a measured result.
- Up to 2x. Usually safe on a sharp source. Even interpolation holds up, and an AI model has little to invent.
- Around 4x. Check the result at 100% before you use it. At 4x, 15 of every 16 pixels are new.
- Beyond 4x. The model is drawing most of the picture. Treat the result as a new image that resembles yours.
Published limits sit in the same range. Google’s upscaling model on Vertex AI accepts three factors, x2, x3 and x4, and caps the result at 17 megapixels (Google Cloud documentation, October 2026). Adobe’s Super Resolution applies one factor, 2x per side.
The source matters as much as the factor. Topaz says on its own page that images with extreme compression or excessive blur “may not recover every lost detail” (topazlabs.com, October 2026).
What do AI upscalers invent?
An AI upscaler invents every detail finer than the pixels in your file. A close guess and a wrong guess look equally sharp.
The research states this plainly. A 2018 paper proved that accuracy and visual quality “are at odds with each other” in image restoration (arXiv, October 2026). A model tuned to look sharp moves away from the true pixels. The SeeSR paper adds that with a badly degraded input, the result “may have semantic errors”. It also names the diffusion model’s “tendency to generate excessive random details” (arXiv, October 2026).
On a product photo that matters, because the shopper buys what the picture shows. Four things can change:
- Texture. A knit, a weave or a leather grain can come back as a different one.
- Text. Small print on a label can turn into shapes that look like letters.
- Logos. Thin strokes and small marks can bend or merge.
- Fine pattern. Stripes, checks and dots can change in count or spacing.
Open the original and the upscaled file side by side, with the upscaled file at 100%. Check the label, the logo, one area of texture and one edge. Do this before a listing goes live and before a print run starts.
The order: fix, then upscale once
Upscaling comes last. An upscaler enlarges everything in the file, and that includes the faults.
- Start from the best original. Use the camera file or the largest export you have. Adobe says of Super Resolution that compression artifacts “might become more visible” after the enlargement (blog.adobe.com, October 2026).
- Fix the picture. Remove dust, correct the light and clean the background at the original size. The guide on how to edit product photos puts those edits in order.
- Upscale once. Go straight to the size you calculated.
- Compare at 100%. Use the four checks from the section above.
- Export for the channel. Save the print file or the web file from the upscaled master, and sharpen the image last, at the export size.
Never upscale twice. A second pass treats the invented detail of the first pass as real. Never upscale a compressed copy either. A file that came back from a chat app has already lost detail.
When to reshoot or run the image again
Reshoot when the source is soft or the product detail must be exact. A photo with missed focus has no detail to enlarge. Our guide to low resolution product images covers how to repair old catalog files and which marketplace minimums apply.
Run the image again when a model made it. A model can often produce a new image at a larger size from the same inputs. It is a new picture, so approve it again.
Extend the canvas when the picture is sharp but the shape is wrong. A banner needs more width, and more pixels on the same frame do not add it. That job is generative fill, which draws new background around the subject.
Video adds one more variable, time. Our guide to AI video upscaling covers it.
Upscaling as the last step of a workflow
One upscale is a small task. Two hundred are a process, and each file can leave at a different size. A brand with 20 to 500 products, a reseller or an agency meets that problem every season.
DesignerBox is AI creative production for brands and agencies. Its image editor follows the order this article describes. The page says each edit keeps the detail and the resolution of the edit before it. It also says to upscale once, as the last step, when the picture is finished (DesignerBox image editor page, October 2026).
You can save that order as a workflow, with the upscale step at the end. A batch then runs the workflow over a sheet with one product per row. Row one and row two hundred leave at the same size. Keep each original file beside its result, and compare the two at 100% before you approve a row.
Anyone can make an AI picture. Making hundreds that still look like your brand is the hard part. The brand rules sit in the workflow, so every row reads the same ones. The full workflow from the first product photo to the finished ad, in one subscription.
The check at 100% stays your job, because no tool knows what your label should say. You download the results, or send them with a webhook or an S3 step. The cost is shown before the run. A single-purpose upscaler can fit better when one large print is all you need.
Uploading your own photos and the commercial license start on the Pro plan. AI video, virtual try-on, upscaling, the image editor and the video editor start on the Premium plan. Plans and credits are on the pricing page.
There is a free plan, and it runs on sample products. Get started free.
FAQ
What is image upscaling?
Image upscaling increases the pixel dimensions of an image. The software creates the new pixels from the ones in the file. Interpolation averages nearby pixels and adds no detail. AI upscaling, also called super resolution, uses a trained model to draw detail that looks right. Neither method can read detail that the camera did not record.
Can you enlarge an image without losing quality?
Up to a point. A sharp source usually survives a 2x enlargement with either method. At 4x an AI upscaler keeps edges sharper than interpolation, but part of the detail is invented. Compare both files at 100% before you use the result.
How do I enlarge an image for printing?
Multiply the print size in inches by the PPI your printer asks for. An 8 x 10 inch print at 300 PPI needs 2,400 x 3,000 pixels. Divide that by the pixels you have to get the upscale factor. Then upscale once from the best original and check the result at 100%.
What image resolution do I need for print?
It depends on the viewing distance. Print vendors give 300 DPI for small, detailed prints and 200 to 300 for posters seen from about 3 feet. They give about 150 for banners seen from 6 feet or more (helloprint.com, 4over4.com and printful.com, October 2026). Check your own printer’s file guide, because each one sets its own numbers.
Is AI upscaling safe for product photos?
It is safe when you check the result. An AI upscaler can change texture, small text, logos and fine pattern. Fix first, upscale once, then compare with the original at 100% before a listing or a print run. Reshoot when the detail must be exact.
Sources
- ESRGAN: Enhanced Super-Resolution Generative Adversarial Networks, on hallucinated details and artifacts (arxiv.org, read October 7, 2026)
- Photo-Realistic Single Image Super-Resolution Using a Generative Adversarial Network (SRGAN), on texture detail at large upscaling factors (arxiv.org, read October 7, 2026)
- Real-ESRGAN: Training Real-World Blind Super-Resolution with Pure Synthetic Data (arxiv.org, read October 7, 2026)
- The Perception-Distortion Tradeoff, CVPR 2018 (arxiv.org, read October 7, 2026)
- SeeSR: Towards Semantics-Aware Real-World Image Super-Resolution, on semantic errors and excessive random details (arxiv.org, read October 7, 2026)
- Pillow documentation, resampling filters: bicubic and Lanczos (pillow.readthedocs.io, read October 7, 2026)
- Google Cloud, Upscale images using Imagen on Vertex AI: factors x2, x3 and x4, and the 17 megapixel limit (cloud.google.com, read October 7, 2026)
- Shopify Help Center, product media types: 2048 x 2048 pixels for square product images (help.shopify.com, read October 7, 2026)
- Google Merchant Center Help, image link attribute: around 1500 x 1500 pixels or above (support.google.com, read October 7, 2026)
- Helloprint, how to set up a file for a large banner: 200, 100 to 150 and 75 DPI by viewing distance (helloprint.com, read October 7, 2026)
- 4over4, resolution for large banners and posters: poster 200 to 300, banner about 150, billboard about 50 DPI (4over4.com, read October 7, 2026)
- Printful print file guide: 150 to 300 DPI, and 300 for smaller detailed products (printful.com, read October 7, 2026)
- Adobe, Super Resolution: twice the width and height, four times the pixel count, and the advice on clean sources (blog.adobe.com, article dated March 2021, read October 7, 2026)
- Topaz image upscaler page: up to 8x, and the note on extreme compression and blur (topazlabs.com, read October 7, 2026)
- DesignerBox image editor: each edit keeps the detail and the resolution, upscale once as the last step, and the plan gates (DesignerBox image editor page and DesignerBox pricing, designerbox.ai, October 2026)
Print resolution figures are each vendor’s own guidelines, and the pixel sizes in the table are our arithmetic from them. The 2x and 4x rule is a working guideline, not a measurement. Tool and model features were read on each vendor’s own page on October 7, 2026, and they change often. Individual results vary.