Image to image AI makes a new picture from a picture you supply. The source picture is the starting point or a reference, and a short text instruction usually says what to change. Text to image starts from words alone. For a brand, the hard part is the product: the model redraws it unless the mode, the references and the instruction tell it what to keep.
Key Takeaways
- One input changes the job. Text to image invents a product from words. Image to image starts from your photo, so the real product can stay in the frame.
- There are three modes. A restyle keeps the layout. An edit keeps everything outside the change. A reference keeps only the subject.
- Five things drift on a product. Logo and label text, color, proportions, material, and the count of parts such as buttons or straps.
- Six controls reduce drift. One approved photo per product, several angles, a keep line, an edit model, one change per run, and a fixed check.
- A person still approves. Google and OpenAI both state consistency limits in their own documentation, so every result is checked against the real product.
What is image to image AI?
Image to image AI is any AI model that takes a picture as input and returns a picture. You upload a photo, a sketch or a render, and you add an instruction. The model returns a new picture that follows the source.
A change of art style is image to image. So is a new background behind a bottle or a new camera angle on a shoe. Search results for the term are full of consumer tools that restyle a portrait. This guide is about product pictures, where the question is what the model must leave alone.
How image to image AI works
Three methods sit behind most tools. The method decides what the picture keeps.
Noise, then redraw. The first widely used method adds noise to your picture and then removes it under the guidance of your text. The SDEdit paper described it in 2021: the method “first adds noise to the input, then subsequently denoises the resulting image” (arXiv 2108.01073, October 2026). A setting called strength controls the amount of noise. The Hugging Face Diffusers documentation says strength “determines how much the generated image resembles the initial image”. It adds that a value of 1.0 “means the initial image is more or less ignored” (Hugging Face, October 2026).
Edit by instruction. The second method trains a model to follow an edit request. The InstructPix2Pix paper from 2022 takes “an input image and a written instruction that tells the model what to do” (arXiv 2211.09800, October 2026).
Pictures as context. The newest image models read pictures and text together in one request. Google’s Gemini image documentation calls this “text-and-image-to-image” and lets you mix up to 14 reference images (ai.google.dev, October 2026). OpenAI’s image edit endpoint lets you “edit existing images” and “generate new images using other images as a reference” (OpenAI image generation guide, October 2026).
Image to image and text to image compared
Text to image has one input: words. The model has never seen your product, so it draws a plausible product of that type. Image to image adds a picture. The picture carries what words cannot carry well, such as the curve of a handle or the layout of a label.
| Text to image | Image to image | |
|---|---|---|
| Input | A text prompt | A picture, usually with a text instruction |
| Where the product comes from | The model invents it | Your photo supplies it |
| Main risk for a brand | A product that does not exist | A real product that changes a little |
Image to image lowers the risk in the last row. Most models still redraw the pixels of the product, so some risk stays.
The three modes and what each keeps
Tools give the modes different names, so ask what each one keeps.
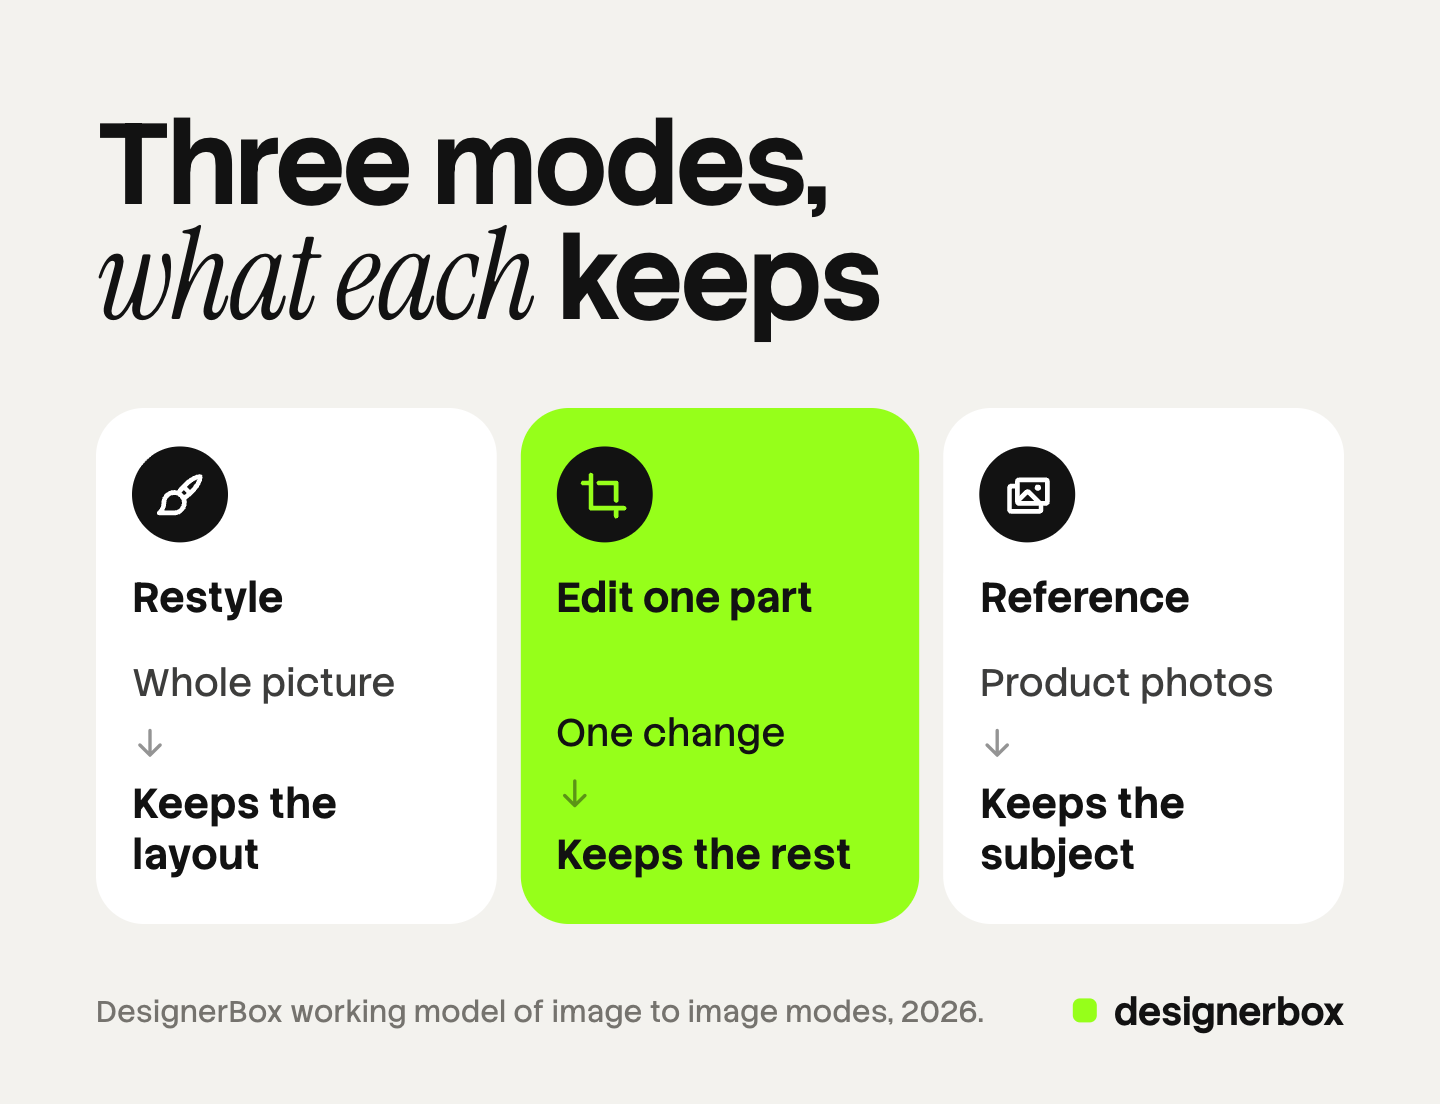
| Mode | What you give | What it keeps | What it redraws | A typical product job |
|---|---|---|---|---|
| Restyle the whole picture | One picture and a style request | The layout and the rough shapes | Every pixel, the product included | A sketch turned into a photo-style concept |
| Edit one part | One picture and one change | Everything outside the change, when the model follows the instruction | The part you name | A new background, a removed prop, a color change |
| Use it as a reference | One or more pictures of the subject and a scene request | The identity of the subject | The whole scene, the pose and the light | The same bag in a street, on a shelf and in a hand |
Restyle redraws all of the product. Use it for concepts, never for a listing.
Edit is the safest mode when the model is built for it. Black Forest Labs describes its FLUX.1 Kontext model as able to “make targeted modifications of specific elements in an image without affecting the rest” (bfl.ai, October 2026). BFL now calls Kontext a previous-generation model and points new work to FLUX.2 (docs.bfl.ai, October 2026). A mask is only a guide. OpenAI writes that with GPT Image “the model uses the mask as guidance, but may not follow its exact shape with complete precision” (OpenAI image generation guide, October 2026).
Reference is the mode behind most lifestyle scenes. The model draws the product again in a new place, and most drift starts here. When the product pixels must not change at all, image compositing places the original cut-out in the scene instead. For edits made by hand with layers and masks, see how to edit product photos.
What drifts on a product, and why
Drift is a small change to the product that nobody asked for.
- Logo and label text. Letters change shape, a word loses a letter, or the label moves.
- Color. A red warms to orange under the scene’s light, and the next picture warms it again.
- Proportions. A cap grows taller, a heel gets thinner, a bottle gets wider.
- Material. Matte leather turns glossy. A knit turns smooth.
- Count of parts. Four buttons become five. A bag gains a strap or loses a buckle.
In a restyle or a reference run, the model does not copy the product. It draws a new one that looks like the reference. Small parts and small text change first.

OpenAI lists as a limitation that the model “may occasionally struggle to maintain visual consistency for recurring characters or brand elements across multiple generations” (OpenAI image generation guide, October 2026). Google DeepMind writes that Nano Banana Pro “can still struggle with small faces, accurate spelling, and fine details in images” (deepmind.google, October 2026).
Drift also compounds. A generated picture used as the next source passes its errors on.
Six controls that reduce drift
None of these removes drift. Each one lowers it.
- One clean, approved reference photo per product. Shoot the product on a plain background, in even light, with the label facing the camera. Every run starts from this photo, never from an earlier result.
- Several angles as references. One front photo cannot show the back. Google documents up to 6 high-fidelity object images for Gemini 3 Pro Image (Nano Banana Pro) and up to 10 for Gemini 3.1 Flash Image (Nano Banana 2). OpenAI’s API reference says “you can provide up to 16 images” for GPT Image models (OpenAI API reference, October 2026). FLUX.2 takes up to 8 through the BFL API (docs.bfl.ai, October 2026).
- A keep line in the instruction. Say what must not change, in the same request as the change. Google’s own template ends with “Keep everything else in the image exactly the same, preserving the original style, lighting, and composition.” Google also advises that, to preserve “critical details (like a face or logo)”, you “describe them in great detail along with your edit request”.
- An edit model over a full redraw. If only the background is wrong, edit the background.
- One change per run. Make one change, check it, then make the next. Google calls multi-turn conversation “the recommended way to iterate on images”.
- A fixed check against the real product. Use the same short list for every picture, with the approved photo beside it. The next section has the list.
Keep one product per request unless the brief is a bundle.
A fixed check against the real product
Put the approved reference photo next to each result at full size. Then check five things, in the same order every time.
- Text. Read every word on the label and the logo, letter by letter.
- Color. Compare the main color and one accent color with the reference.
- Shape. Compare the outline and the ratio of height to width.
- Material. Look at the finish: matte or gloss, smooth or textured.
- Count. Count the buttons, straps, pockets, eyelets and items in the pack.
A picture that fails one check goes back for an edit or a new run. Review the set side by side as well, because slow drift only shows across several pictures. For the full scoring method, see the AI product photo accuracy test. For the cost of rejected pictures, see AI image retry rate.
Accuracy is also a channel rule. Google Merchant Center says shoppers expect the image “to accurately reflect the exact version, color, and finish they are selecting”. It also requires that images created with generative AI keep metadata that says so (Google Merchant Center Help, October 2026).
For one look across a whole catalog, see consistent product images. For brand rules across every asset, see AI brand consistency. For people and mascots, see the AI character reference image guide.
Image to image in DesignerBox
DesignerBox is AI creative production for brands and agencies. Anyone can make an AI picture. Making hundreds that still look like your brand is the hard part.
In Create, the card “Change one thing” is an edit, and “Put it in a real place” and “Reshoot your product” start from your product photo. The Photo Angles app makes new camera angles from a single photo. The image editor makes one edit after another. The picture keeps its detail and resolution.
You add each product to a brand once, and every template then uses it. You write rules as plain sentences, and workflows read them before every prompt. A batch then runs one workflow, app or image model over a sheet of up to 200 rows. The DesignerBox Batch guide shows the sheet. The cost is shown before the run.
AI can still change small text, logos and fine texture. The brand page says it directly: “Nothing checks the result.” Rules guide a run, and a person checks every picture against the real product. Photos, ads and video sit in one account: the full workflow from the first product photo to the finished ad, in one subscription.
Uploading your own photos and the commercial license start on the Pro plan. AI video, virtual try-on, upscaling, the image editor and the video editor start on the Premium plan. Plans and credits are on the pricing page. There is a free plan, and it runs on sample products. Get started free.
FAQ
What is the difference between image to image and text to image?
Text to image makes a picture from words alone. Image to image starts from a picture you supply, usually with a text instruction. A photo shows your exact product, so the model has something real to follow.
Does image to image AI keep my product exactly the same?
Not on every run. An edit of one part can keep the rest of the picture. A restyle or a reference run draws the product again, so small text, color and part counts can change. Check every result against an approved photo.
How many reference images should I use?
Use the approved front photo plus the angles the scene will show, such as the side and the back. Google documents up to 6 or 10 high-fidelity object images, depending on the model. OpenAI documents up to 16 input images. Keep to one product per request.
Why does my logo change in AI pictures?
The model draws the logo again from the reference, and small letters change first. OpenAI names precise text placement and clarity as a limit of its image models. Use a sharp label photo, say in the instruction that the logo must not change, and read the result letter by letter.
Can DesignerBox run image to image on a whole catalog?
Yes. A batch runs one workflow, app or image model over a sheet of up to 200 rows, and each product photo can be a row. You see the cost before the run, and you judge each picture yourself. Uploading your own photos starts on the Pro plan.
Sources
- Noise then denoise as an editing method: SDEdit: Guided Image Synthesis and Editing with Stochastic Differential Equations, arXiv 2108.01073, accessed October 2026
- Editing from an input image and a written instruction: InstructPix2Pix, arXiv 2211.09800, accessed October 2026
- The strength setting: Hugging Face Diffusers documentation, image-to-image, accessed October 2026
- Text-and-image-to-image, up to 14 reference images, object image limits by model, the editing prompt templates and multi-turn editing: Google, Gemini API image generation documentation, accessed October 2026
- Stated limits of Nano Banana Pro: Google DeepMind, Gemini 3 Pro Image, accessed October 2026
- Image edits, reference images, prompt-based masking and stated consistency limits: OpenAI, image generation guide, accessed October 2026
- Up to 16 input images for GPT Image models: OpenAI API reference, image edits, accessed October 2026
- FLUX.1 Kontext targeted edits: Black Forest Labs, FLUX.1 Kontext, accessed October 2026
- Kontext as a previous-generation model: Black Forest Labs documentation, FLUX.1 Kontext image editing, accessed October 2026
- FLUX.2 multi-reference limits: Black Forest Labs documentation, FLUX.2 overview, accessed October 2026
- Variant accuracy and AI image metadata: Google Merchant Center Help, image link, accessed October 2026
- DesignerBox Create cards, the Photo Angles app and brand rules: the DesignerBox app, read October 2026
- DesignerBox batch and 200 rows a sheet: DesignerBox batch page (designerbox.ai/product/batch), October 2026
- DesignerBox plan gates: DesignerBox pricing page (designerbox.ai/pricing), October 2026
Model facts verified on each vendor’s own documentation in October 2026. Model limits change often, so check the vendor page before you plan a large run. The six controls and the five-point check are our working advice, not vendor rules. Individual results vary.