
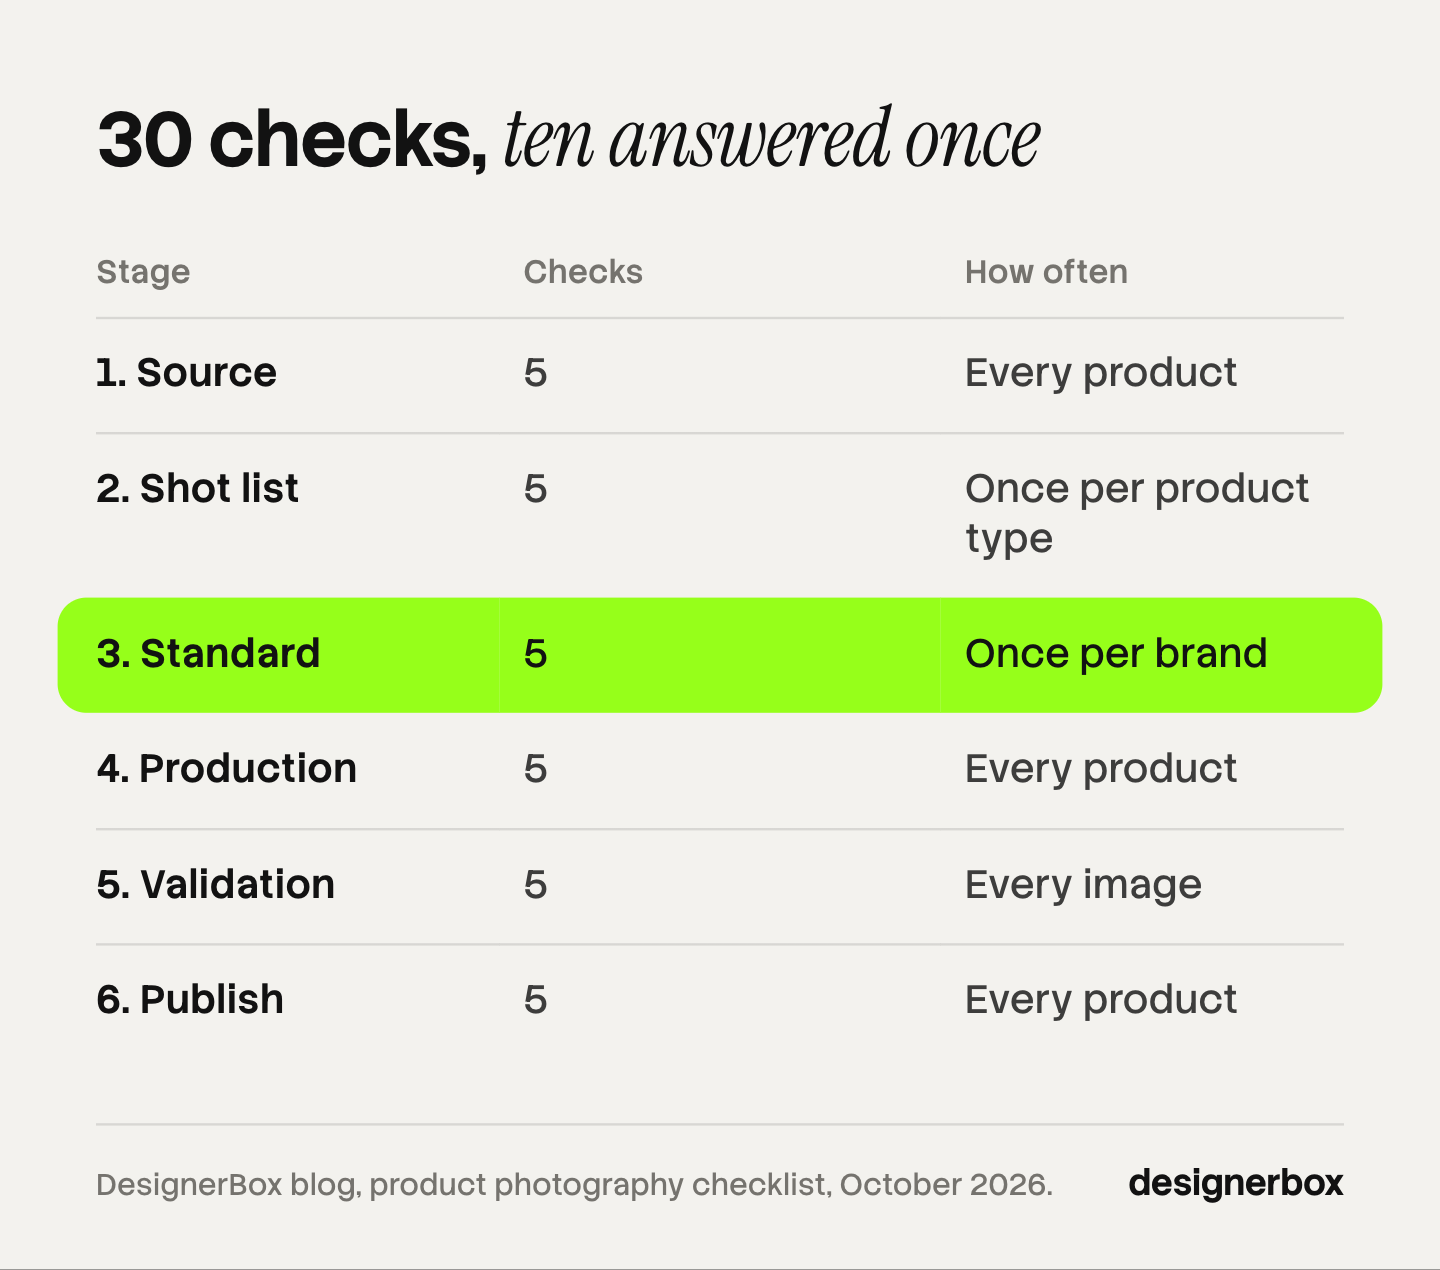
A product photography checklist is a fixed list of pass or fail checks that every new product goes through, from the source photo to the live listing. This one has 30 checks in six stages: source, shot list, standard, production, validation and publish. You answer 10 of them once per brand. The other 20 repeat for every product.
A shoot checklist covers the camera, the light and the props. The slow part comes later. Somebody has to decide the crop, the background and the file size again for each new product, and then decide whether the image is ready.
This guide puts those decisions on one list. Each check has a pass condition you can read in a second. It is written for brands with 20 to 500 products, and for the agencies that produce listing images for them.
Key Takeaways
- 30 checks, six stages. Source, shot list, standard, production, validation and publish. Every product goes through all six.
- 10 checks are answered once. The shot list and the standard are brand decisions. You write them down and stop deciding them.
- 20 checks repeat per product. They cover the source photo, the production method, the finished image and the listing.
- A check needs a pass condition. “Good crop” is an opinion. “The product fills 85% of the frame” is a check.
- Marketplaces publish many of the answers. Amazon, Google and Shopify state the background, fill, size and metadata rules.
- Generated images add two checks. Compare the product with the source photo, and keep the AI metadata in the file.
What is a product photography checklist?
A product photography checklist is a written list of conditions a product image must meet before it goes on a listing. Each line has one question and one pass condition. A second person can run the list and reach the same answer as the first person.
A checklist is different from a workflow. A workflow sets the order of the stages and who does each one. Our guide to the product photography workflow covers that order and which stages to automate. A checklist is the test at each stage.
The pass condition does the work. “Check the background” leaves the answer to the person. “The background is pure white, RGB 255, 255, 255” gives the answer to the list. With 10 products the difference is small. With 200 products and three editors, it decides whether the catalog looks like one brand.
The 30 checks at a glance
The six stages follow the path of one product. Two stages are set once. Four repeat.
| Stage | Checks | How often | What it settles |
|---|---|---|---|
| 1. Source | 5 | Every product | The photo every later image starts from |
| 2. Shot list | 5 | Once per product type | Which images a product needs |
| 3. Standard | 5 | Once per brand | Background, fill, size, shadow, file name |
| 4. Production | 5 | Every product | How each image is made |
| 5. Validation | 5 | Every image | Whether the image is ready |
| 6. Publish | 5 | Every product | Whether the right image is on the right listing |
The count matters for planning. A new product does not need 30 decisions. It needs 20 checks against 10 decisions you already made.
Stage 1: source photo checks
Every later image starts from one photo of the real product. An error in that photo repeats in every image made from it, so these five checks come first.
| # | Check | Pass when |
|---|---|---|
| 1 | Product is clean | No dust, creases, stickers or fingerprints at 100% zoom |
| 2 | Whole product is in frame | No edge is cut, and the product is in focus from front to back |
| 3 | Color is true | The photo matches the real product under daylight |
| 4 | Marks are readable | Logos, labels and prints are sharp at 100% zoom |
| 5 | File is large enough | The longest side is 2048 pixels or more |
Check 5 uses 2048 pixels because Shopify says a square image of 2048 x 2048 pixels usually displays best (Shopify Help Center, October 2026). Amazon turns on zoom at 1,000 pixels on the longest side, so a 2048 pixel source covers both (Amazon Seller Central, October 2026).

Check 3 is the one people skip. A screen cannot tell you the color is right. Put the product next to the screen, in daylight, and compare. Our guide to the source product photo covers the setup.
Stage 2: shot list checks
The shot list answers one question: what does a shopper need to see? You answer it once for each product type, such as “mugs” or “jackets”. Every product of that type then gets the same set.
| # | Check | Pass when |
|---|---|---|
| 6 | Main image | One image of the product alone on a plain background |
| 7 | Second angle | The back, the side or the inside is shown |
| 8 | Detail | One close image shows the material or the main feature |
| 9 | Scale | One image shows the product next to a person or a known object |
| 10 | Variants | Each color or style has its own image |
Check 9 has research behind it. Baymard’s testing found that 42% of users try to judge the size of a product from the product page images (Baymard Institute, October 2026).
Check 10 is a rule on Google. Google asks for a unique image for each variant, and it says to show only one variant per image (Google Merchant Center Help, October 2026).
The count per product follows from this list. Amazon requires at least one compliant main image and recommends at least six more, plus one video (Amazon Seller Central, October 2026). A shot list template turns the five checks into rows you can hand to a photographer.
Stage 3: standard checks
The standard is the set of visual decisions that never change between products. Each one is a single written line. Once they are written, nobody decides them again.
| # | Check | Pass when |
|---|---|---|
| 11 | Background | One value is written, for example pure white |
| 12 | Fill | One percentage is written for how much of the frame the product takes |
| 13 | Size and shape | One aspect ratio and one export size are written per channel |
| 14 | Shadow | One shadow type is written, or none |
| 15 | File name | One naming pattern is written |
The marketplaces give you starting values for three of the five.
| Decision | Amazon main image | Google Merchant Center |
|---|---|---|
| Background | Pure white, RGB 255, 255, 255 | No promotional overlays, watermarks or borders |
| Fill | The product shows as 85% of the image | No less than 75% and not more than 90% of the image |
| Size | 500 to 10,000 pixels on the longest side | At least 500 x 500 pixels for all products from 31 January 2027, with 1500 x 1500 recommended |
Sources: Amazon Seller Central and Google Merchant Center Help, both October 2026.
A fill of 85% passes both rules, so it is a safe value to write for check 12. For check 15, Amazon’s own pattern is the product identifier, a variant code and the file type, separated by periods, such as B000123456.MAIN.jpg (Amazon Seller Central, October 2026). Our guide to the image file naming convention gives a pattern for the files you keep.
The five lines belong in a product photography style guide. The guide can be one page. What matters is that it exists outside one person’s head.
Stage 4: production checks
Production is where the images are made. Some come from the camera, some from an edit and some from an AI model. The checks are the same for all three.
| # | Check | Pass when |
|---|---|---|
| 16 | Method per shot | Each shot on the list has one method: photo, edit or generated |
| 17 | Same settings | The preset or workflow is the one used on the last product |
| 18 | Start from the source | Every image is made from the source photo, never from an edited copy |
| 19 | Nothing added | No text, watermark, border or promotional badge is on the image |
| 20 | Only the product | No prop or accessory appears that the buyer does not receive |
Check 18 prevents slow drift. An edit made on top of an edit loses a little detail each time. Going back to the source photo for each image keeps the product the same in all of them.
Checks 19 and 20 come from the marketplaces. Google does not accept images with promotional overlays, watermarks or borders (Google Merchant Center Help, October 2026). Amazon’s main image shows only one unit of the product and the accessories included with it, and no props that could confuse the customer (Amazon Seller Central, October 2026). Lifestyle images further down the gallery have more room.
Stage 5: validation checks
Validation defines what “ready” means. Without it, every image can go back for one more edit, and nobody knows when to stop.
| # | Check | Pass when |
|---|---|---|
| 21 | Product matches the source | Color, shape, logo and print are the same as in the source photo |
| 22 | Standard is met | Background, fill, size and shadow match the five written lines |
| 23 | Image is sharp | Clear, with no pixelation and no jagged edges |
| 24 | No generation defects | No warped print, garbled logo, extra object or wrong shadow |
| 25 | Metadata is kept | An AI image still carries its AI metadata tag |
Run check 21 with the source photo beside the result. Memory is not a reference. Check 23 uses Amazon’s own wording for image quality: clear, non-pixelated, no jagged edges (Amazon Seller Central, October 2026).
Checks 24 and 25 apply to generated images. A generated scene can change the product itself, and our guide to AI product photo accuracy lists the defects to look for.
Check 25 is a published rule. Google says all images created with generative AI must contain metadata that shows the image was AI-generated, and it tells sellers to keep the IPTC DigitalSourceType tag (Google Merchant Center Help, October 2026). Amazon asks sellers to tag an image that includes photorealistic AI-generated people before they upload it (Amazon Seller Central, October 2026). This is general information, not legal advice. Our guide to AI product photos and marketplace rules covers more channels.
Stage 6: publish checks
The work is finished when the right image is on the right listing. A good image on the wrong variant is a wrong image.
| # | Check | Pass when |
|---|---|---|
| 26 | File is named | The name follows the written pattern |
| 27 | Right product, right variant | The blue image is on the blue variant |
| 28 | Order is set | The main image is first, and the rest follow the shot list |
| 29 | Alt text is written | One sentence describes what the image shows |
| 30 | Live listing is checked | You opened the listing on a phone and saw every image |
Check 30 takes one minute and finds what the other 29 cannot. A channel may crop, compress or reorder an image after upload. Google notes that it may test subtle cropping on an image (Google Merchant Center Help, October 2026). You only see that on the live page.
Which checks are answered once?
Checks 6 to 15 are answered once. They are decisions about the brand and the product type, and they do not depend on the product on the table today.
This is where most of the saved time is. A team with no written standard makes those 10 decisions again for each product. For 200 products that is 2,000 decisions, and each one can come out a little different. A team with a written standard makes them 10 times in total.
Change the 10 answers when something real changes: a new product type, a new sales channel, or a rule change such as Google’s 500 x 500 pixel minimum on 31 January 2027. Do not change them because one product looks odd. One product is an exception, and you handle it by hand.
Our guide to consistent product images explains how to test a catalog for drift once the standard is in place.
How many checks can software run?
Software can run the checks that have a number or a fixed value as the pass condition. On this list that is 9 of the 20 repeating checks.
| Kind of check | Checks | Who runs it |
|---|---|---|
| A number or fixed value | 5, 17, 18, 22, 23, 25, 26, 28, 29 | Software, with a person sampling |
| A judgment about the product | 1, 2, 3, 4, 16, 19, 20, 21, 24 | A person |
| A check on the live listing | 27, 30 | A person |
File size, background value, fill, export size and file name are all measurable. A script or an editing tool can test them on every file. Color against the real product is a comparison only a person with the product can make.
The split is a planning tool. Count the person checks, time them on 20 images, and you know the review time for the drop before you start.
Checks inside one workflow
DesignerBox is AI creative production for brands and agencies. Anyone can make an AI picture. Making hundreds that still look like your brand is the hard part. A checklist is how you hold the brand, and DesignerBox puts the 10 one-time answers inside the run.
You write the standard once in your brand rules. You build a workflow once with those rules and your shot list. Every run reads the same rules, so checks 11 to 14 and check 17 are settled before the first image exists. For the product side of this job, see AI product photography.
A batch runs that workflow over a sheet, one product per row, with up to 200 rows in one sheet. The cost of the whole sheet is shown before the run (DesignerBox batch page, October 2026). Each row shows its state. You keep or discard each result, and you re-run one row without changing the others. That is where you run checks 21 and 24, with the source photo beside each result.
The same subscription covers the ads and the video made from those images, so the full workflow from the first product photo to the finished ad is in one place.
The limits are worth stating. Stage 1 stays with you, and so does the final keep or discard decision on every image. DesignerBox does not publish to a store, so checks 26 to 30 happen after you download the results or send them with a webhook or an S3 step. Uploading your own photos and the commercial license start on the Pro plan. AI video, virtual try-on, upscaling, the image editor and the video editor start on the Premium plan. Plans and credits are on the pricing page.
Scale content without limits.
Generate content for your products or services with AI, starting today, and keep your brand on every piece. Write the 10 answers once, then run the list on every new product. Get started free
FAQ
What should a product photography checklist include?
It should include six groups of checks: the source photo, the shot list, the visual standard, the production method, validation and publishing. Each check needs a pass condition a second person can read, such as a pixel size or a fill percentage. A list of reminders with no pass conditions leaves every decision open.
What do you need to check before a product photoshoot?
Check the product and the plan. The product is clean, with no dust, creases or stickers. The shot list names each image the product needs. The standard gives the background, the fill and the export size. With those three ready, the shoot only has to record the product accurately.
How many photos does one product need?
Plan for at least five: a main image, a second angle, a detail, a scale image and one image per variant. Amazon requires one compliant main image and recommends at least six additional images and one video for each product (Amazon Seller Central, October 2026).
How do you know a product image is ready to publish?
An image is ready when it passes five checks. The product matches the source photo. The background, fill and size match the written standard. The image is sharp. A generated image has no changed product details. An AI image still carries its metadata tag.
How often should you update the checklist?
Update the 10 one-time answers when a product type, a sales channel or a published rule changes. Google’s minimum of 500 x 500 pixels for all products from 31 January 2027 is one example. Leave the list alone when a single product does not fit, and handle that product by hand.
Do AI product images need extra checks?
Yes, two. Compare the product in the generated image with the source photo, because a model can change a logo, a print or a seam. Then confirm the file still carries its AI metadata. Google asks sellers to keep the IPTC DigitalSourceType tag on images made with generative AI (Google Merchant Center Help, October 2026).
Can DesignerBox run this checklist for me?
It can hold the one-time answers and apply them on every run. Your brand rules and your workflow carry the standard, and a batch shows each result for you to keep or discard. You see the cost before you press Run. The source photo, the comparison with the real product and the live listing stay with you.
Sources
- Amazon product image requirements: main image count and recommended additional images, pure white background, 85% fill, pixel limits and zoom, image quality wording, file naming, included accessories and props, and the tag for photorealistic AI-generated people: Amazon Seller Central, product image requirements, accessed October 2026
- Google Merchant Center image rules: overlays, watermarks and borders, the 75% to 90% framing guidance, one variant per image, the 500 x 500 pixel minimum from 31 January 2027, generative AI metadata and automatic cropping: Google Merchant Center Help, image link, accessed October 2026
- Shopify recommended square image size of 2048 x 2048 pixels: Shopify Help Center, product media types, accessed October 2026
- 42% of users try to judge product size from product page images: Baymard Institute, the current state of product page UX, accessed October 2026
- DesignerBox batch: one product per row, up to 200 rows, row states, re-running one row and the cost shown before the run: DesignerBox batch page (designerbox.ai/product/batch), October 2026
- DesignerBox brand rules read on every run: DesignerBox brand page (designerbox.ai/product/brand), October 2026
- DesignerBox plan gates: DesignerBox pricing page (designerbox.ai/pricing), October 2026
Amazon, Google, Shopify and Baymard facts verified on each publisher’s own page, October 2026. DesignerBox features verified on designerbox.ai, October 2026. The 2,000 decisions example is illustrative arithmetic. Individual results vary.