Flat lay photography shoots a product from directly overhead, lying flat on a surface. Some sellers call it lay flat photography; it is the same shot under a different name. It works when two things hold: the camera sits parallel to that surface, so edges stay square, and every image in the set shares one light direction, so shadows fall the same way. Styling comes after. Those two rules are what make a catalog row look deliberate.
Props, backgrounds and the rule of thirds produce one good photo. They do not tell you why forty good photos still look wrong when they sit next to each other on a collection page.
The answer is geometry. A flat lay fails in ways that are invisible on a single image and obvious in a grid, and both failure modes are measurable before you upload anything.
This covers the two rules, the physical setup, camera settings and composition. It also covers the image specs Amazon, Shopify and Etsy publish, what breaks when you generate flat lays instead of shooting them, and the step from a flat lay photo to an on-model photo.
Key Takeaways
- Two rules decide a flat lay: camera parallel to the surface, one light direction across the set. Everything else is styling and can be changed later.
- Tilt is the hardest defect to see. A few degrees off perpendicular turns a square product into a trapezoid, which reads as sloppy only once the images are side by side.
- Product positioning and scaling carry measurable weight. A RecSys ‘24 field study found roughly 5% relative click-through improvement from attention to positioning and scaling alone, before any background work. Overall gains from generated images ran from 4% to 40%, depending on catalog and placement, all significant at p < 0.05 (arxiv.org/abs/2408.12392, accessed September 2026).
- Amazon’s main image rule is stricter than the rest. It asks for pure white, RGB 255, 255, 255, and the product shown as 85% of the image (sellercentral.amazon.com, as of September 2026). For clothing, Amazon’s clothing guide also rules out borders, logos, watermarks and text in the main image (sellercentral.amazon.com, as of September 2026).
- Generated flat lays change camera angle and light direction on every image. That breaks both rules, so a template or a saved workflow matters more than a clever prompt.
- Reflective, transparent and heavily labeled products are the hard cases. Check reflections and small type at 100% before anything ships.
- A clean flat lay is also the input for an on-model shot. Square edges and even light give an AI try-on step true proportions and a real print to copy.
What is flat lay photography??
Flat lay photography is a top-down product shot. The product lies flat on a surface and the camera points straight down at it, so the image shows the full shape, pattern and layout in one frame. Apparel, stationery, cosmetics, jewelry and food use it heavily because it removes the need for a model, a mannequin or a set. Small reflective pieces bring their own problems on top of these two rules, which is the subject of jewelry product photography. Scarves invert the problem. Amazon asks for clothing accessories flat in the main image, but a flat laydown hides the drape. Scarf product photography works through that conflict. Glass bottles and jars add their own set of problems. Skincare product photography has to keep a legally required label readable in the same frame.
It is the cheapest complete product image to produce. It is also the easiest to produce inconsistently, because the rig gets rebuilt between shoots and nothing records where the light was.
For the plain definition on its own, DesignerBox keeps one at what a flat lay is. For where it sits against the other shot formats a listing needs, see the types of product photography. Products that do not lie flat, such as hats, need a different build, which hat photoshoot ideas covers. The rest of this is execution.
The two rules that decide whether a flat lay works
A flat lay carries almost no depth cues. There is no horizon, no perspective, no background falloff. The eye has two things to judge it by: whether the edges are square, and where the shadow falls. If those are wrong, styling cannot save the image.
Rule 1: the camera plane must be parallel to the surface
If the sensor is not parallel to the table, parallel edges on the product converge. A rectangular box becomes a trapezoid. A folded shirt leans. On one image this reads as a slightly odd crop. In a grid of forty product cards, some rectangles are true and some are not, and the row looks unfinished without the viewer being able to say why.
Three things fix it:
- Shoot from a fixed overhead arm or copy stand, not handheld and not from a tripod leaned over the table. A leaned tripod introduces tilt you cannot see through the viewfinder.
- Use a level. Most phones and mirrorless bodies have a built-in electronic level. Zero it before the first frame and check it after any bump.
- Add distance and use a longer focal length. A wide lens close to the product stretches the edges of the frame. More distance with a longer lens flattens the geometry and keeps the product’s proportions honest.
Center matters too. The product should sit under the middle of the lens. A product parked at the edge of a wide frame picks up distortion even when the camera is perfectly level.
Rule 2: one light direction for the whole set
Shadows are the only thing telling a viewer where the light came from. If one SKU’s shadow falls to the bottom right and the next one’s falls left, the collection page looks like it was assembled from three different shoots, because it was.
Fix the light position and leave it. Use one large soft source at a consistent angle, and a bounce card on the opposite side if you want to lift the shadow. Record both positions so the next drop matches. A phone photo of your own rig is a legitimate production document.
Diffused daylight from a window works until the weather changes or the season moves. If your catalog takes more than a day to shoot, use a controlled source. If you already shot a set under drifting light, a correction pass can bring it to one light direction without a reshoot. How to fix product photo lighting covers that pass.
How to prepare a flat lay shoot
The setup is short. The discipline is in repeating it identically.
- Choose a surface and keep it. Matte paper, painted board, linen or stone. Neutral tones stay out of the way. Glossy surfaces bounce light back into the product and create hotspots you will retouch later.
- Mount the camera overhead and level it. Lock the arm. Mark the height.
- Set one light and one bounce. Note the angle and distance.
- Place the product under the lens center. Square it to the frame edges deliberately, or angle it deliberately, but pick one and apply it to every SKU.
- Lock exposure, white balance and focus distance. Auto white balance drifts between frames and will hand you a catalog in four slightly different whites.
- Shoot a reference frame first. Keep it open on a second screen and match every later frame to it.
- Style last. Props, folds and negative space are the only part of this list you should be changing between shots.
Steps 2, 3 and 5 are the ones people skip, and they are the three that cause the reshoot.

Camera settings for a flat lay photo
A flat lay has almost no depth, so the settings have one job. They keep the whole frame sharp and every product at the same exposure. Two published guides reach that by opposite routes.
Nikon School suggests a narrow aperture, such as f/16, and a longer shutter speed to match, such as 1 second, with the camera on a tripod (Nikon School, accessed September 2026). A narrow aperture keeps a tall item and the surface under it both in focus. The School of Photography suggests shutter priority at 1/125 of a second, or 1/250 if you still see blur, with ISO on auto (The School of Photography, accessed September 2026).
Both work for one photo. For a catalog, pick one route and set every value by hand. Auto ISO and auto white balance change between frames, so two products shot a minute apart get different brightness. Write the numbers down with the rig notes and use them again for the next drop.
How to compose a flat lay photo
Composition decides what the shopper looks at first. For a catalog, treat it like light: choose one layout per product type and repeat it on every product of that type.
Three layouts cover most catalogs:
| Layout | What it looks like | Use it for |
|---|---|---|
| Single hero | One product, centered and squared to the frame, on a plain surface | The main marketplace image and the first card in a collection grid |
| Grid, also called knolling | Several items at right angles, with even gaps | Kits, sets, multipacks and images of everything in the box |
| Styled scatter | The product with a few props at loose angles | Secondary images, social posts and ads |
Three habits keep any of them easy to read:
- Balance the visual weight. A large item on one side needs something of similar weight on the other (The School of Photography, accessed September 2026).
- Leave room for text if the image becomes an ad. Compose for the final crop, so a headline has a clear area.
- Use the thirds grid. Nikon School suggests placing key items where the rule-of-thirds lines cross. It also notes that square is the most popular format for flat lays. For a creator, the flat lay is one of five post types in a weekly set, and our guide on how to become a fashion influencer covers the other four.
A prop earns its place only if the product still reads at thumbnail size.
Flat lay image specs for Amazon, Shopify and Etsy
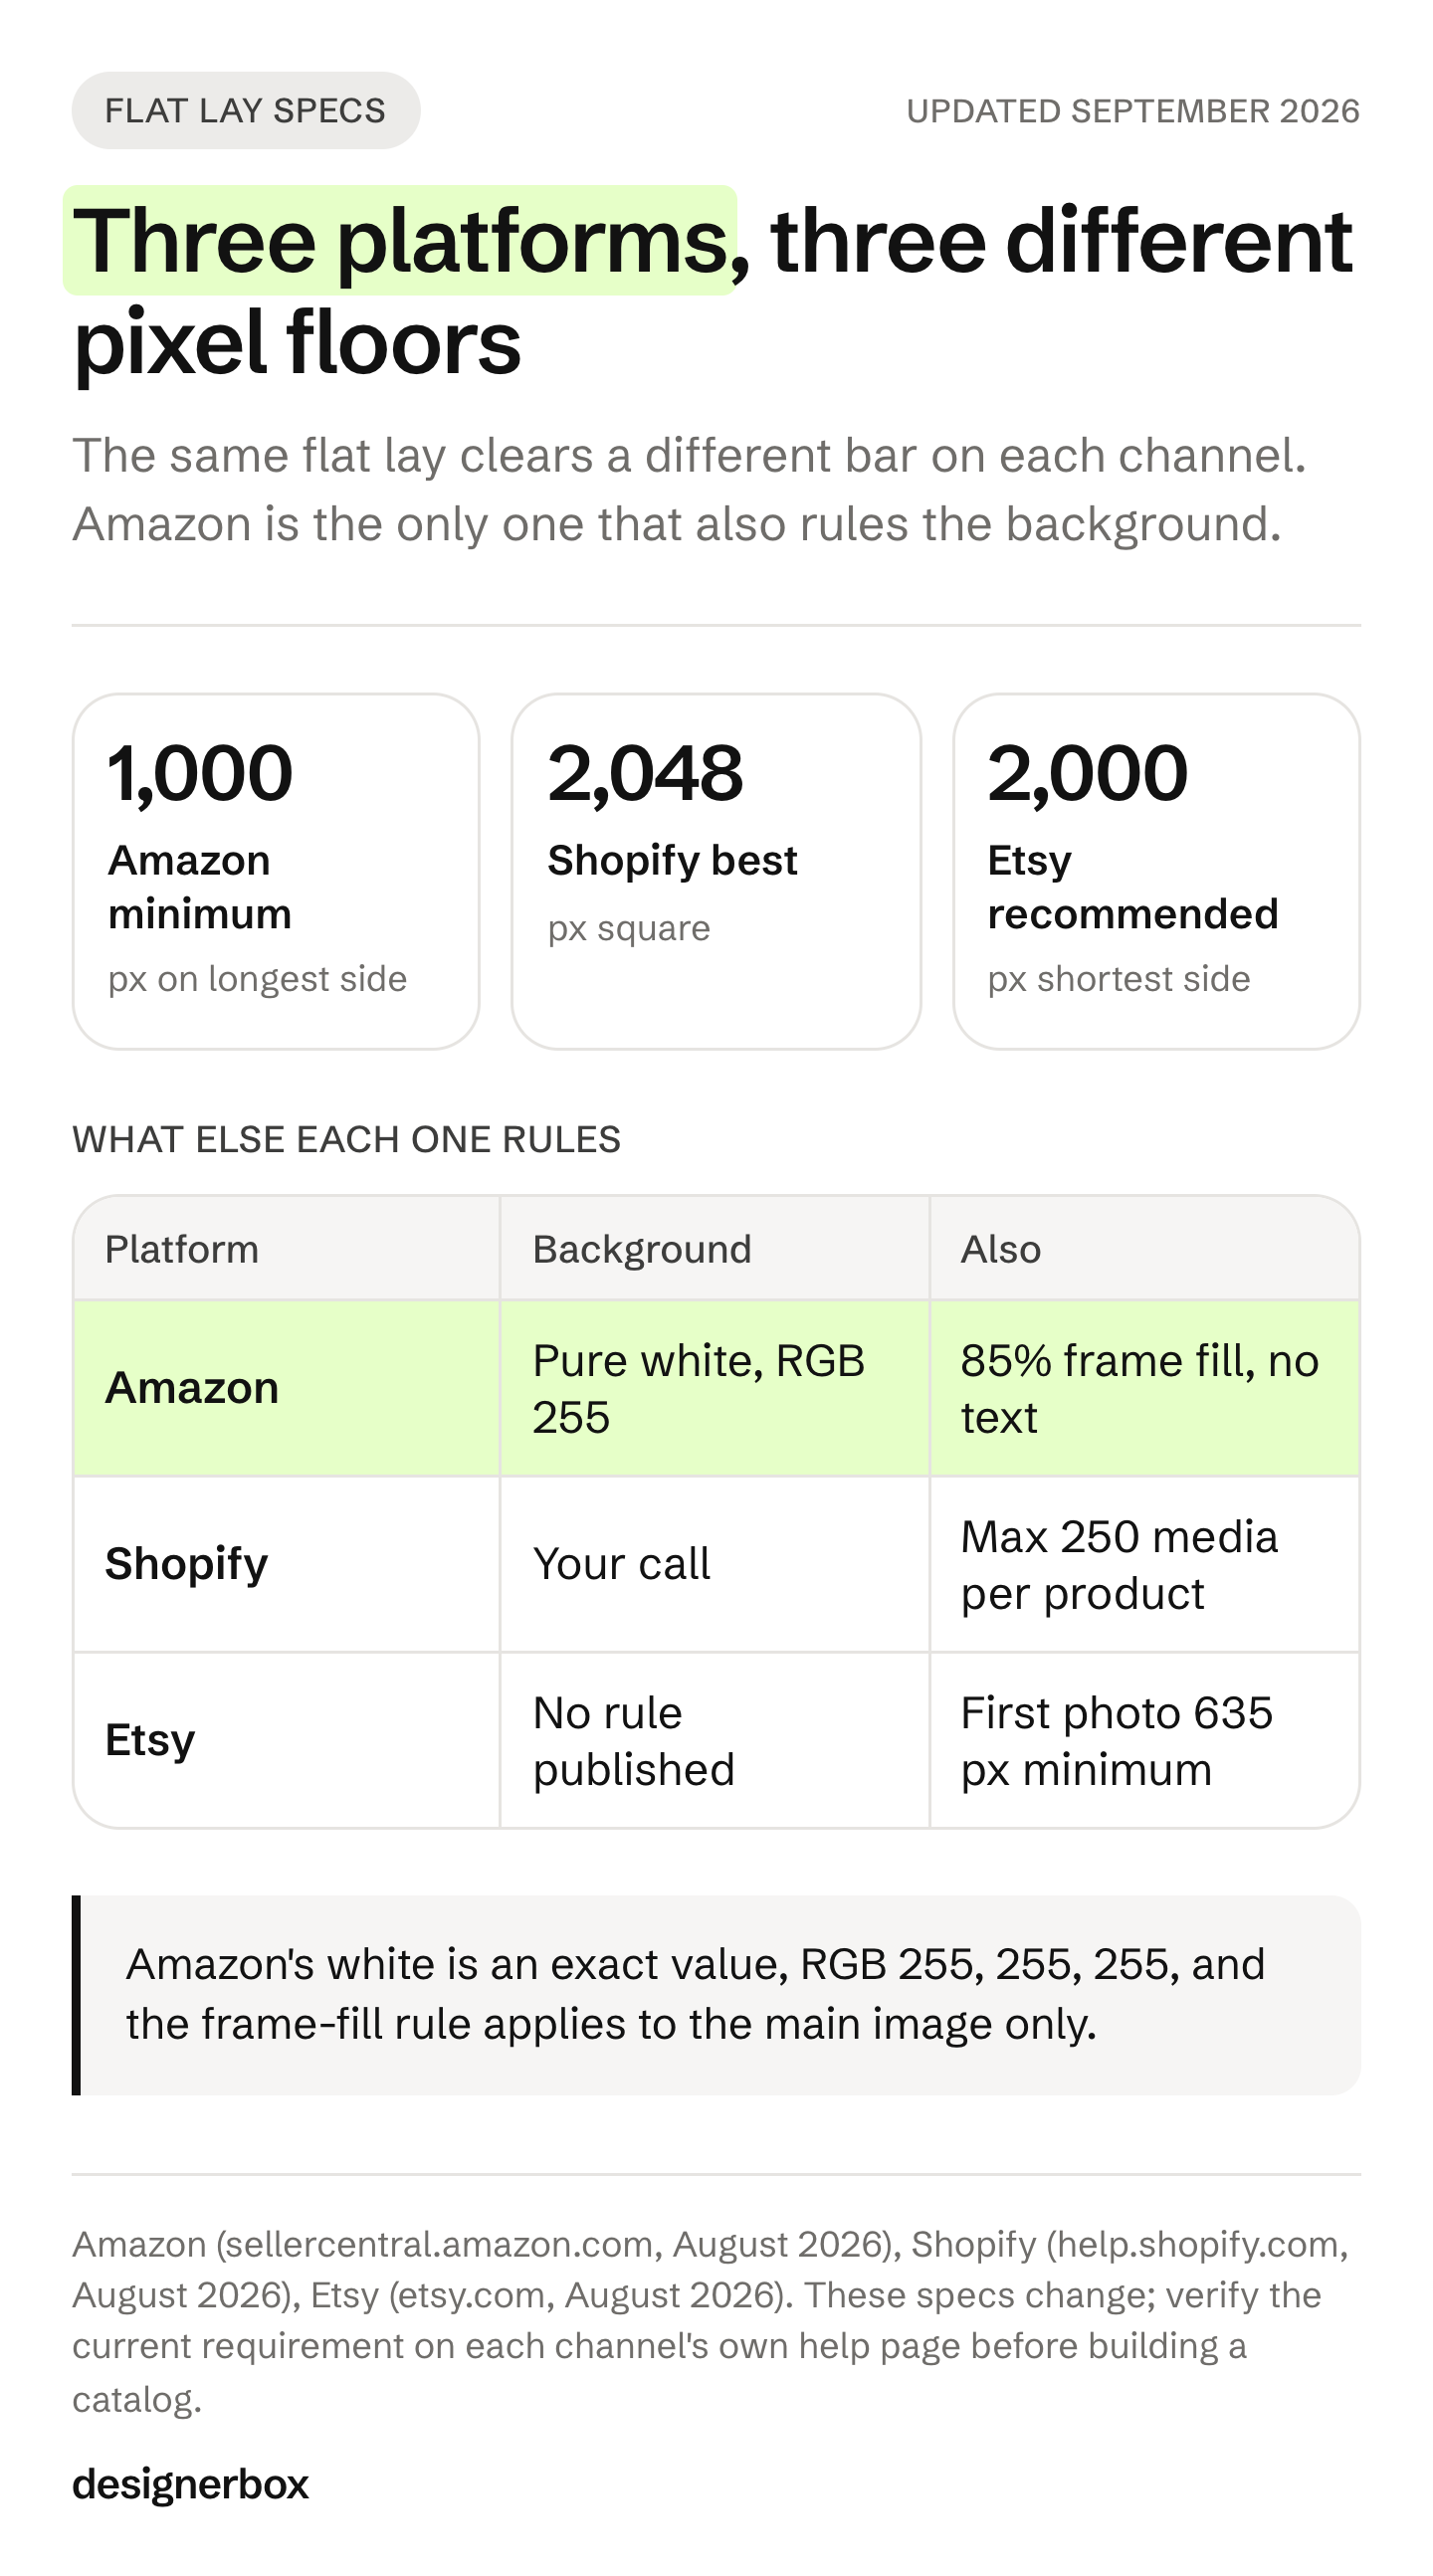
Marketplace requirements decide the export settings, and they differ enough to matter. Amazon governs the main image tightly, Shopify governs file weight, and Etsy recommends a minimum width and height.
Garments are the exception worth flagging. Amazon’s clothing guide asks for adult apparel on a model in the main image, so a flat laydown belongs in the alternate images for that category (sellercentral.amazon.com, as of September 2026). The clothing photography shot list works through it in full.
| Platform | What it requires | Source |
|---|---|---|
| Amazon (main image) | Pure white background, RGB 255, 255, 255. Product shown as 85% of the image. At least 500 px on the longest side, and 1,000 px or more to turn on zoom. For clothing, no borders, logos, watermarks or text | sellercentral.amazon.com, September 2026 |
| Shopify | Up to 5,000 x 5,000 px or 25 MP, under 20 MB per file. 2,048 x 2,048 px usually displays best for square product images. Maximum 250 media items per product | help.shopify.com, September 2026 |
| Etsy | At least 2,000 px wide and tall recommended. Etsy says the first photo should be at least 635 px wide and tall so it does not appear lower in search | help.etsy.com, September 2026 |
Amazon’s main image rule is the one that catches styled flat lays. A linen surface, a prop sprig and a soft shadow are all fine on secondary images and all disqualifying on the main one. Shoot or generate both versions from the same setup rather than fixing them later.
To decide which shots earn a place in the gallery, the complete product photography shot list covers what each angle answers.
Where AI flat lays break
Generating a flat lay removes the rig and the reshoot. It also removes the two controls that rule one and rule two depend on, because a model invents a camera angle and a light direction on every generation unless something holds them fixed.
Material is the other thing that slips. Matte and woven surfaces survive generation well. Glazed, glass and metallic finishes are the weak set. That limit matters more for home decor product photography than for any other flat lay category.
Four cases need checking before anything ships:
- Shadow direction drifts between images. Ask for the same scene twice and the light moves. This breaks rule two silently, one SKU at a time.
- Reflective and transparent products invent their surroundings. Glass, chrome, polished jewelry and clear packaging pick up reflections of a room that was never there. Zoom to 100% and read the reflection.
- Small type degrades. Ingredient panels, care labels and logo lockups are where generated packaging fails. If the label is legally required to be legible, treat generation as the background and composite the real label.
- Fabric folds stop obeying physics. A garment flat lay depends on how the sleeve falls. Cross-check drape against a real photo of the same piece. Knits are the strictest case here, and photographing knitwear sets out which gauges hold and which invent their own stitch.
None of these is a reason to stop generating. They set where the human check goes: the reflection, the label and the shadow, not the general look.
Marketplace disclosure is a separate question from image quality, and it varies by platform. Our guide to the rules on AI product photos and disclosure covers where labeling is expected.
Flat lay photography for clothing
Flat lay photography for clothing has one problem the rest of a catalog does not: the garment has to look like it has a body in it while lying on a table. Four steps do most of that work.
How to steam, fold and pin clothing for a flat lay
- Steam it first. A crease reads as damage in a thumbnail, and no edit removes a shadow cast by a fold.
- Fold it to the shape the shopper should read. Tuck the sleeves at a slight angle instead of straight down, so the shoulder line stays visible.
- Pin from underneath. Pins hold the shape in place. A pin head on top shows in the photo.
- Give the body some volume. A sheet of tissue paper inside the garment lifts the front a little, so it does not lie flat and empty.
Fill the frame the way the marketplace expects. A shirt shot loose on a wide surface looks small on a collection page next to one that fills its crop. Shoot the front, the back and one detail crop of the fabric or the label, in that order, and keep all three at the same distance so the set reads as one garment.
When a flat lay cannot show how a piece hangs, a ghost mannequin shot is the next step up, and a ghost mannequin template is one way to make it. An on-model image is the step after that.
From flat lay to on-model photo
A flat lay shows the garment’s shape, print and detail. It does not show how the garment fits or falls on a body. A ghost mannequin shot adds shape. An on-model shot adds fit. You can make the ghost mannequin version from the flat lay itself, and AI ghost mannequin covers what the AI has to invent when you do.
The flat lay you already shot is the input for an AI on-model shot. A try-on step copies the image you give it. A squared, evenly lit flat lay gives it true proportions and a print it can follow. A tilted one gives it a leaning garment.
Check the result against the flat lay, never against the face. Look at the print where it crosses a seam, the logo, the collar ribbing and the sleeve length. Those are the places where a generated garment drifts from the real one. The full method, with one model held across a range, is in how to put clothes on a model with AI.
Two policies apply at this step. Amazon’s clothing image guide says only photos are allowed in the main image, and it does not say whether a photorealistic AI image counts as one (sellercentral.amazon.com, as of September 2026). Check that before a generated on-model image goes into a clothing listing on Amazon.
Article 50 of the EU AI Act requires deployers to disclose deep fakes, and it has applied since 2 August 2026 (European Commission FAQ on Article 50, September 2026). The Commission’s guidelines, published 20 July 2026 and not binding, count “realistic AI-generated human avatars or personas” as persons (European Commission, September 2026). A realistic on-model shot is therefore likely in scope. A real photo of a flat lay is not AI content. This is general information, not legal advice.
On-model shots in DesignerBox
Clothing catalog turns one garment into four shots: front, three-quarter, back and a fabric close-up. Virtual try-on puts your garment on a model.
Uploading your own photos and the commercial license start on the Pro plan. AI video, virtual try-on, upscaling, the image editor and the video editor start on the Premium plan. Plans and credits are on the pricing page.
Consistency across 200 flat lays
Consistency at catalog scale is a systems problem. Shooting solves it with a locked rig. Generating solves it with a locked input.
A saved template does for a generated set what a marked tripod height does for a shot set. It fixes surface, camera angle, light direction and crop, then varies only the product. In DesignerBox, a garment flat lay template builds compositions from your own product photos. You run the same template for each product in the set. For a store that adds products every week, see DesignerBox for ecommerce brands.
The model you pick changes what a flat lay costs, and the cost of each run appears before you start it. There is a free plan, so you can see how a run works before you pay.
Both routes still need one accurate photograph of the real product. Generation changes what happens after that photo exists. For the comparison against a studio quote, what a product photoshoot costs sets out day rates and the reshoot cycle. What a template locks in is worth reading before you save one.
The source photo, the flat lay template, the on-model step, the brand rules and the finished files sit in one place. The full workflow from the first product photo to the finished ad, in one subscription. The rig notes and the images they produced stay together. You set the brand once, and the workflow reads it on every run.
Build the setup once on one product. Decide the surface, the light direction and the crop there. A saved workflow then runs the same way on every SKU after it, and that is the whole difference between a good shoot and a system. Batch runs one workflow over a whole sheet of products, with the same standard on row one and row two hundred. Start from a template, add your products, and run it on your first SKU.
Mistakes that only appear in a catalog row
Every one of these passes review on a single image.
- Mixed light direction across SKUs. It stays invisible until the grid loads.
- Inconsistent product scale. A small item shot to fill the frame sits next to a large one shot to fill the frame, and the shopper loses all sense of size. Decide whether scale is relative or absolute across the set, then hold it.
- Auto white balance left on. Four whites in one collection page.
- Crop ratios that drift. Square, 4:5 and 3:4 mixed in one row produce ragged card heights.
- Shadow density changing with the weather. A daylight shoot spread over three days.
- Props that outrank the product. Styling that reads beautifully alone and buries the item in a 300 px thumbnail.
The check is cheap. Build a contact sheet of the full set at thumbnail size before publishing. Every one of these defects is obvious there and none of them is obvious at full size. A resale shop meets the same test on its profile grid, which Depop shop photos works through.

Garments have one extra option worth knowing. When a flat lay cannot show how a piece sits on a body, ghost mannequin photography gives shape without a model.
Multipacks have their own rule. Amazon’s product image guide asks for clothing accessories and multipacks flat, without a model, which is the starting point for sock photography and any other pack-sold item.
Affiliate roundups face a harder version of this, because the products in one flat lay come from different brands and different shoots. Affiliate roundup images covers bringing a mismatched set to one look.
FAQ
What lens or focal length is best for flat lay photography?
A short telephoto, roughly 50mm to 100mm on full frame, is the safe range. It puts enough distance between the camera and the product to keep edges from stretching. Wide lenses close to the surface distort the corners of the frame, which is the same defect as camera tilt and equally visible in a grid.
Do you need a tripod for flat lay photography?
An overhead arm or copy stand beats a tripod. A tripod leaned over the table introduces tilt that is hard to detect through the viewfinder, and it moves between setups. A locked overhead arm with a marked height is repeatable, which is what the second and third shoots need.
What background works best for flat lay product photos?
Matte and neutral. Painted board, uncoated paper, linen or stone in a tone that does not compete with the product. Glossy surfaces reflect the light source back into the frame and create hotspots. Amazon main images need pure white regardless of what the styled version uses.
Can you use an AI-generated flat lay as an Amazon main image?
Only if it meets the main image rule: a pure white background at RGB 255, 255, 255, the product shown as 85% of the image, and a realistic, professional-quality image of the real product (sellercentral.amazon.com, September 2026). A generated styled scene with a linen surface fails that rule. Amazon’s general image guide does not mention AI. For clothing, Amazon says only photos are allowed, so a generated garment flat lay is a risk there.
How many flat lay images does one product listing need?
One flat lay rarely carries a listing alone. It answers shape and layout, and leaves material quality, scale and the reverse side unanswered. Most listings pair a flat lay with a detail crop and an in-scale shot, then add angles as the category demands.
Why do my flat lays look tilted even though the camera looked straight?
The camera was not parallel to the surface. A few degrees is enough to converge the product’s edges, and that much tilt is invisible through a viewfinder. Use the electronic level in the camera or phone, zero it before the first frame, and re-check after any contact with the rig.
Is it cheaper to shoot flat lays or generate them?
Catalog churn decides it, more than the cost of a single shoot. A one-off set of ten products is cheap either way. A catalog that turns over every drop pays the setup cost repeatedly when shooting, and pays it once when the setup is saved as a template. Run the comparison per SKU per year, not per image.
Sources
Marketplace image specifications verified from Amazon’s product image guide and clothing image guide (sellercentral.amazon.com), Shopify Help (help.shopify.com) and Etsy Help (help.etsy.com) as of September 2026. Click-through figures from Czapp et al., “Dynamic Product Image Generation and Recommendation at Scale for Personalized E-commerce”, RecSys ‘24 (arxiv.org/abs/2408.12392). Camera settings and composition guidance from Nikon School and The School of Photography, accessed September 2026. EU AI Act Article 50 application date and deployer duty from the European Commission FAQ on Article 50, and the “realistic AI-generated human avatars or personas” wording from the Commission’s Guidelines C(2026) 5054, published 20 July 2026 and not binding, accessed September 2026. DesignerBox plan credits and the virtual try-on plan: DesignerBox pricing page (designerbox.ai/pricing), September 2026. Individual results vary.